You can perform the machine learning classification algorithm on audio files to detect the word spoken. If you are stuck on how to perform the audio word classification on audio files, then you have come to the right place. I will explain it in this article. Further, I will show how to create a graphical user interface(GUI) for the program. We will use GUI to feed the input to the model. Then it will display the output of the model. I will use the Flask framework for creating GUI. Lastly, we will make use of the python virtual environment to create the project. If you are not familiar with python’s virtual environment then check out my article on python virtual environment. It is not compulsory to use the python virtual environment.
Prerequisite and setup
In order to process audio files, we need a python audio package. The name of the package is called Librosa. In order to use the machine learning algorithm, the package name is called scikit-learn. For the GUI part, the python package is called a flask. The sounddevice package to record the audio file, scipy to write the “.wav” audio file, pickle package to save the model but it comes builtin with python3. Now, let’s create the setup with all the required packages.
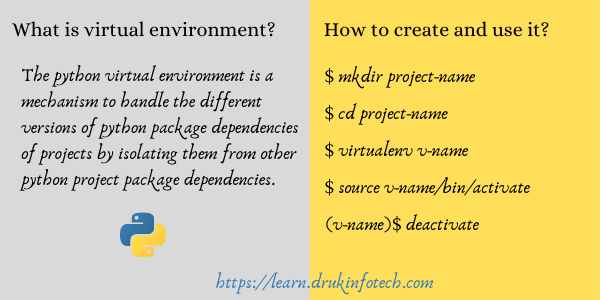
$ mkdir audioWord-ml
$ cd audioWord-ml
audioWord-ml$ virtualenv audioWord-ml-venv
Note that, the command “virtualenv” may not be available in your system. If so then check out my article on python’s virtual environment. If the virtual environment is created successfully then you can see the directory called “audioWord-ml-venv”. Now activate it to install the required python packages for the project.
audioWord-ml$ source audioWord-ml-venv/bin/activate
(audioWord-ml-venv) audioWord-ml$ pip3 install scikit-learn
(audioWord-ml-venv) audioWord-ml$ pip3 install librosa
(audioWord-ml-venv) audioWord-ml$ pip3 install flask
(audioWord-ml-venv) audioWord-ml$ pip3 install sounddevice
(audioWord-ml-venv) audioWord-ml$ pip3 install scipy
(audioWord-ml-venv) audioWord-ml$ pip3 install numpy
Audio word classification using ML algorithms
Let’s understand the problem statement. We will use a few words to perform classification. The word that I am going to use is “Bye”, “Hi”, “Good”, and “Hello”. You can make use of your own choice of words. These words are the classes. Each word/class will contain a few samples of audio files. For instance, the class “Bye” will contain a few audio files in which the “Bye” word will be spoken. Note that the format of the audio files should be in the “.wav” file. If you use other formats like mp3, it may not be able to load/read the audio file.
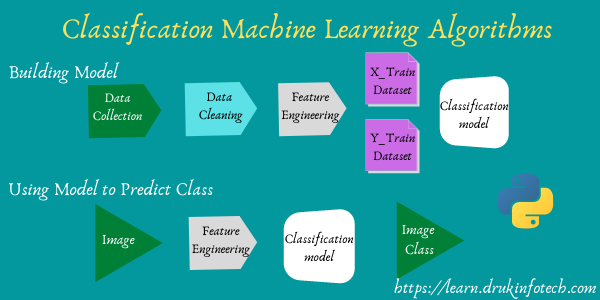
We will use these audio files to train our model. The classification algorithm that we will use is called the random forest classifier. The dataset and project structure organization can be accessed from here.
Steps for the machine learning algorithm
#The typical steps for all machine learning algorithms.
1. Data Collection
2. Data Cleaning
3. Feature Extraction
4. Build Model
5. Test Model
6. Deploy Model
Building RandomForestClassfier model
The reason behind using the librosa package is that it comes will the audio feature extraction. It has a variety of feature extraction methods. I am going to make use of Mel-Frequency Cepstral Coefficients(mfcc). You can make use of other feature extraction methods or combinations of two or many. It is up to your decision. Whichever gives better results you can make use of it.
#loading all audio files, extracting features and preparing X and y dataset
X = []
y = []
audio_dir = os.listdir("data/")
for audio_cls in audio_dir:
	audio_files = os.listdir("data/"+audio_cls+"/")
	for audio_name in audio_files:
		audio, freq = librosa.load("data/"+audio_cls+"/"+audio_name, sr=44100)
		mfccs_feature = librosa.feature.mfcc(y=audio, sr=freq)
		mfccs_feature = mfccs_feature.flatten()
		X.append(mfccs_feature)
		y.append(audio_cls)
		print("Building Model.....")

#Creating train and test dataset
X_train, X_test, y_train, y_test = train_test_split(X, y)

rfc_model = RandomForestClassifier()
rfc_model.fit(X_train, y_train)
y_predict = rfc_model.predict(X_test)

print("Accuracy {:.2f}%".format(accuracy_score(y_test, y_predict)*100))

#Saving the model for later use
with open("rfc_model.model", "wb") as write_model:
	pickle.dump(rfc_model, write_model)
Creating a graphical user interface(GUI)
The user interface has two main functions. One is to record the audio file. You have to speak a word within three seconds. After that, it will be saved in the system. The other function is to run the model. When you click on the “Run Model”, it will load the random forest classifier model which was built and saved before. Then it will display the class of the spoken word.
The app.py file of the flask is given below.
from flask import Flask, render_template, request
import pickle, librosa
from scipy.io.wavfile import write
import sounddevice as sd
app = Flask(__name__)
#Recording and saving the audio file
def audio():
    freq = 44100
    duration = 3
    audio_file = sd.rec(int(duration*freq), samplerate=freq, channels=2)
    sd.wait()
    write("static/test_audio.wav", freq, audio_file)

@app.route("/", methods = ["GET", "POST"])
def index():
    record_status = 1
    model_status = 1
    if request.method == "POST":
        if request.form.get('record') == "Start Recodring":
            audio()
            record_status = 0
            return render_template("index.html", record_status=record_status, model_status=model_status)

        if request.form.get('model') == "Run Model":
            with open("rfc_model.model", "rb") as read_model:
                rfc_model = pickle.load(read_model)

            audio_file, freq = librosa.load("static/test_audio.wav", sr=44100)
            mfcc_feature = librosa.feature.mfcc(y=audio_file, sr=freq)
            mfcc_feature = mfcc_feature.flatten()
            model_status = rfc_model.predict(mfcc_feature.reshape(1,-1))
            return render_template("index.html", model_status=model_status[0])

    return render_template("index.html", model_status=model_status, record_status=record_status)

if "__name__" == "__main__":
    app.run(debug=True)
The index.html file is given below.
<!DOCTYPE html>
<html>
<head>
	<meta charset="utf-8">
	<meta name="viewport" content="width=device-width, initial-scale=1">
	<title>ISL Exam</title>
</head>
<body>
	<div style="background-color: skyblue; position: absolute; top: 50%; left: 50%; transform: translate(-50%, -50%); padding: 20px; box-shadow: 10px 10px grey; text-align: center;">
		<h1 style="">Audio Word Classification Model</h1>
		<hr>
		<style type="text/css">
			.button{
				border-radius: 25px;
				transition: 0.5s;
				box-shadow: 10px 10px 15px grey;
				font-size: 15px;
				padding: 10px;
			}
			.button:hover{
				background-color: green;
				color: white;
			}
		</style>
		<form action="/" method="post">
			<label> Speak a word within 3 seconds</label><br><br>
			<input class="button" type="submit" value="Start Recodring" name = "record"><br><br>
			{% if record_status != 1 %}
			<audio controls>
				<source src="static/test_audio.wav" type="audio/wav">
			</audio><br><br>
			{% endif %}
			<input class="button" type="submit" value="Run Model" name = "model"><br><br>

		</form>

		{% if model_status != 1%}
		<h2>Model detected audio word as {{ model_status }}</h2>
		<a href="{{url_for('index')}}"><button class="button" > Clear Result</button></a>
		{% endif %}

		<marquee style="color: red;">
			Click on start recording button. Then speak a single word. Recorded audio will be shown below.
		</marquee>
	</div>
</body>
</html>
Once everything is done with coding, then you can run the project with the following command.
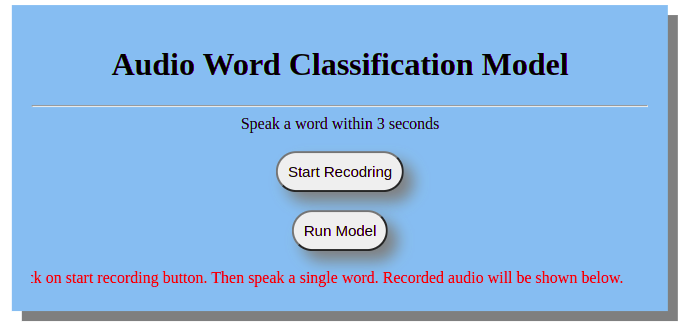
(audioWord-ml-venv) audioWord-ml$ flask runThe graphical user interface looks like the picture given below.
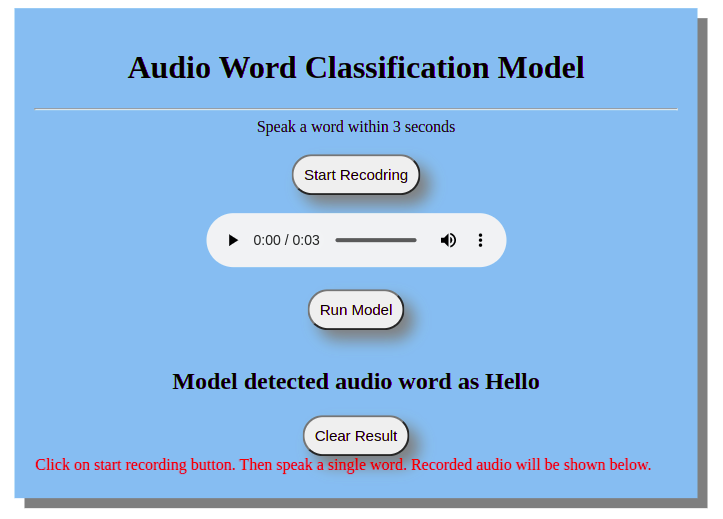
Once you click on start recording and then click on the run model, the output will look like the given below.
Conclusion
You have learned about the following things in this article.
- Audio word classification using random forest classifier.
- Save the machine learning model using a pickle.
- Record audio files using sounddevice package and save them using scipy package.
- Process the audio file using librosa package.
- Create GUI using flask framework.
- Work with Python virtual environment.
One of the drawbacks of the above project is that the input word spoken should be within the predefined words. If it is not from the predefined words, it still gives the class name within the predefined one. Whichever class resembles more similarity. Because we have not implemented the “None” class concept
You may be interested to learn about the following topics. Check them out.
Learn how to deploy your Python application on heroku platform

I am an enthusiastic tech guy. Ever ready to learn new technology. I love building software solutions that can help mankind to solve problems.
You can support us by:
- Becoming a patron at https://www.patreon.com/drukinfotech
- Buy me coffee at https://www.buymeacoffee.com/drukinfotech