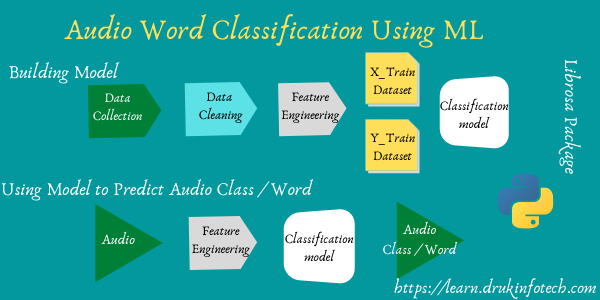
Classification is a supervised machine learning technique. One of the classification problems can be done on images. The images can be classified into different classes. Therefore we will build the image classification model on a real-time dataset. Once the model is built we will use it to predict the image class it belongs to. The image classification algorithm that we are going to use is Support Vector Machine and Random Forest Classifier. You can use the scikit-learn library for it. For processing images, we will use the OpenCV(Open Source Computer Vision) library. Some of the other libraries used are NumPy and os.
Image Classification Using Machine Learning Algorithms
This is a simple implementation of image classification on three classes of image datasets. The datasets are composed of bottles, chairs, and trees. The datasets can be accessed from here.
Steps for Classification Technique
#The typical steps for all machine learning algorithms.
1. Data Collection
2. Data Cleaning
3. Feature Extraction
4. Build Classification Model
5. Test Model
6. Deploy Model
Source Code for Image Classification
The images of bottles, chairs, and trees are collected using the mobile phone camera. There are around 30 images in each class. The images are kept under a specific folder manually(data cleaning). The grayscale pixel value of the image is used as the feature of the image.
#Preparing dataset X and Y
import os
import cv2
import numpy as np
from sklearn.model_selection import train_test_split

cls_dir = os.listdir(".")
X = [] #contains features of images
Y = [] #contains class label of images
for cls in cls_dir:
  cls_img = os.listdir(img_cls_path+cls)
  for image in cls_img:
    img = cv2.imread(img_cls_path+cls+"/"+image, cv2.IMREAD_GRAYSCALE)
    img = cv2.resize(img, (150, 200), cv2.INTER_AREA)
    feature = np.reshape(img, (img.shape[0]*img.shape[1]))
    #Appending feature and class name
    X.append(feature)
    Y.append(cls)

X = np.array(X).reshape(len(X), -1)
Y = np.array(Y)
#Splitting data into train and test set
X_train, X_test, Y_train, Y_test = train_test_split(X, Y)
Now the datasets for training and testing purpose is ready. Let’s build the classification model of the Support Vector Machine and Random Forest Classifier. For it, we will use scikit-learn to create the model.
from sklearn.model_selection import train_test_split
from sklearn.svm import SVC
from sklearn.ensemble import RandomForestClassifier
from sklearn.metrics import accuracy_score


#Splitting data into train and test set
X_train, X_test, Y_train, Y_test = train_test_split(X, Y)

#Using the Support Vector Classifer to build model
svc_model = SVC(kernel="poly", gamma="auto")
svc_model.fit(X_train, Y_train) #Training the model
y_predict = svc_model.predict(X_test) #Testing the model
print("SVC accuracy {:.2f}%".format(accuracy_score(Y_test, y_predict)*100))

#Using the Random Forest Classifier to build model
rfc_model = RandomForestClassifier() #default hyperparameters used
rfc_model.fit(X_train, Y_train) #Training the model
y_predict = rfc_model.predict(X_test) #Testing the model
print("RFC accuracy {:.2f}%".format(accuracy_score(Y_test, y_predict)*100))
Now the two models are built successfully. Let’s use the model to predict the class for a given image. For it, process the image in the same way that is done while building the model. Then feed it to the model to predict the class it belongs to.
import cv2
import numpy as np
img = cv2.imread("./bottle.jpg", cv2.IMREAD_GRAYSCALE)
img = cv2.resize(img, (150, 200), cv2.INTER_AREA)
feature = np.reshape(img, img.shape[0]*img.shape[1])
print("SVC predicted: ", svc_model.predict(feature.reshape(1,-1))[0])
print("RVC predicted: ", rfc_model.predict(feature.reshape(1,-1))[0])
A graphical interface can be created from which you can upload images and display the class label. So you can either create a web-based or desktop-based graphical interface. You can use kivy, pyqt5, Tkinter, etc… libraries for developing graphical interfaces in python.
Conclusion
In this article, I have demonstrated the simple implementation of a supervised multi-class classification machine learning algorithm. The two algorithms used are the support vector classifier and the random forest classifier from the scikit-learn library. Both models are able to perform a pretty good classification of the given classes of images. The support vector classifier is performing better than the random forest classifier algorithm. The possible reason could be the images used are distinct from each other, there are fewer numbers of data used for each class, etc…
“The performance of machine learning model depends mainly on how well you do the feature engineering on data input.”
You may be interested to learn about the following topic. Check them out.
You can host your python web application online free of cost on heroku platform. Check out the video to know more about it. You can deploy your machine learning model also.

I am an enthusiastic tech guy. Ever ready to learn new technology. I love building software solutions that can help mankind to solve problems.
You can support us by:
- Becoming a patron at https://www.patreon.com/drukinfotech
- Buy me coffee at https://www.buymeacoffee.com/drukinfotech